Showing posts with label Freeform Peyote. Show all posts

Sunday, June 3, 2012

Inspiration from Bead Street Classes

In the last couple of weeks I have received at least a dozen emails from people in  Italy, Hungary, Germany, London, the Netherlands and Turkey telling me what fabulous beading we are doing in lil' ol Boise, Idaho.  Who knew?  I do know that the Super Duos (aka Twins) and Peanut beads (aka Farfalle or Butterfly beads) have been in Europe for a while.  I also know that the CzechMates (aka Tiles) and Tila beads have not.  So I'm sure that's part of the interest in this blog.

A big, big, thank you to my  Czech glass bead vendor - I get the new beads first and then our instructors create new patterns for our classes.  But then our students take those patterns and tweak them, bling them up and make them their own.  All of that even before the new beads are even introduced at the major bead shows. 

Some of you may not think this is a big deal but  I came to Boise in 1972 before there were any bead stores in Boise, the only art show was 'Art in the park', and long before Boise Town Square Mall.   Since I was a beader - resources and inspiration were lacking in this otherwise wonderful town.  To remember those days and now get emails suggesting we are on the leading edge of jewelry trends - even creating  'the'  trend..... amazing!

So keep up the great work.   I've been telling everyone that their creations are 'fabulous'.  Hopefully they now believe me.  Here is a sampling of students' work.  As a side note, we currently have 30 colors of the Twin beads, and 50 or 60 colors of the Super Duos should be here this next week. We also stock almost 100 colors of the CzechMate Tiles and 60+ colors of the Japanese Miyuki Tilas.
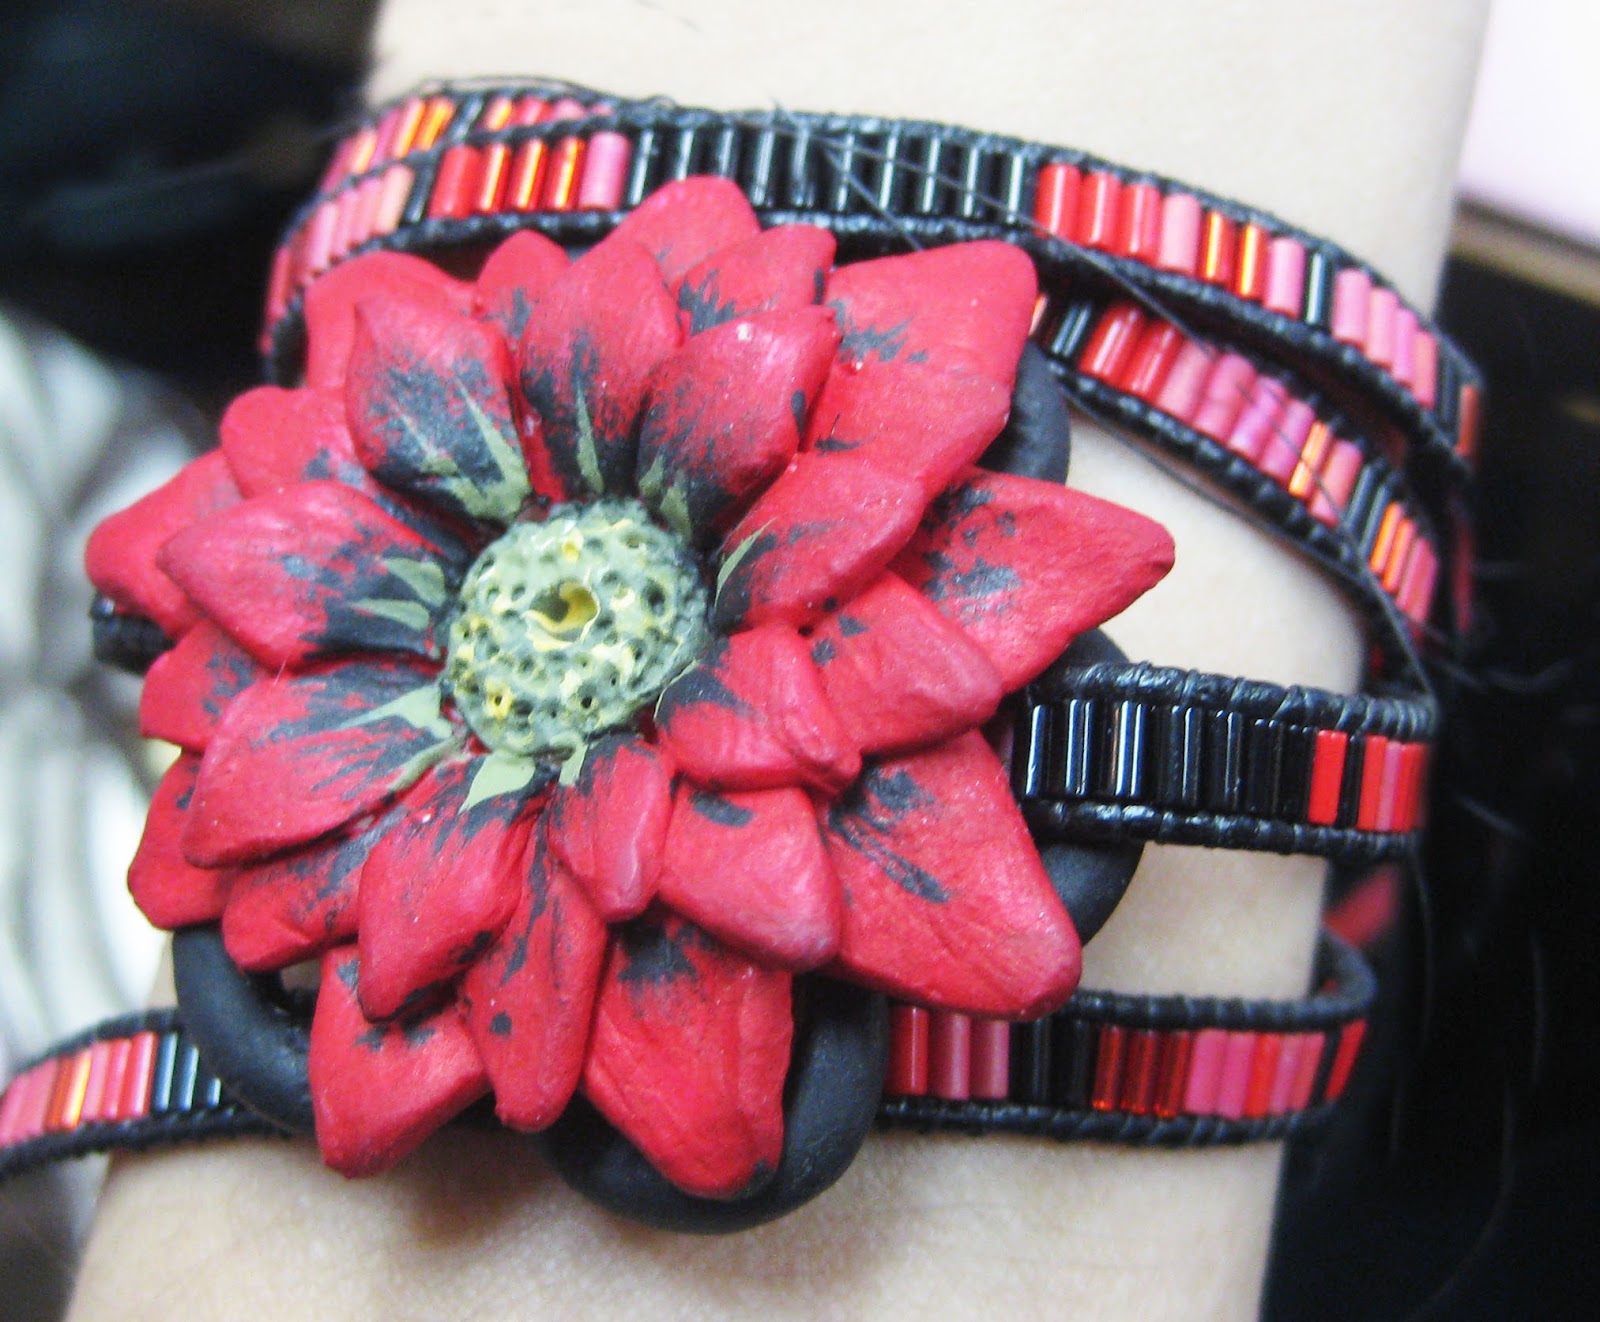
Irene beaded this  ladder stitch bracelet using bugle beads
 in a random pattern.  She also made the flower from polymer clay. 
 I think this was the very first project she did with clay.
You can find a how-to for the 'Chan Luu' style bracelet under Videos.


This is going to be a new class - coming soon. 
 From Penny Dixon - see more of her work on her blog,
http://www.pennydixondesigns.com/

This is from Janet.  She learned this technique in a Russian Spiral bracelet class
and then made this great necklace. I think she found this wonderful ceramic pendant
in Seattle when she was visiting her new grandchild. 
Oops, maybe giving away too much info.
Love how she beaded her own 'bail'. 


Nancy Sathre-Vogel, created this freeform peyote piece a while ago. 
But I just recently learned that the 'fish' are actually
 chopstick holders she found in Thailand.
Nancy and her family are hiking the Rocky Mountains
this summer but we will schedule her freeform
peyote class again in the fall.


Janet learned how to bezel a couple different ways
 in two or three different classes. 
Now she is 'bezeling' a lot of things - here a Tagua nut.

Love how she finished this necklace with her own 'beaded toggle'.


This is just a small portion of  Deb's beautiful, freeform necklace. 
 She learned the technique in Nancy's Freeform Peyote class. 
 Deb also combined 'ruffleing' and netting (she learned in other classes)
and added other stitches she already knew, to make this stunning piece.


A closeup of another section.  We'll have more on this later. 
 I think this necklace deserves a post of its own.


A beautiful peyote and netting ruffled pearl necklace.
 This was done by Boise Bead Society President, Mary Ireland,
in a class she attended at Bead Street.


Joy beaded all of these.  Top one she learned in Bead Street's Tila Band class
from a pattern designed by Adele Kimpell. 
Middle is a pattern Joy purchased from Kassie Inman. 
Bottom from a Tila/Tile Spiral class taught by Sandy Taylor from another Adele pattern.

Right Angle Weave (RAW) with Peanut beads beaded by Virginia. 
This is the 'Gator' pattern designed by Adele Kimpell.
 Virginia created her own version by changing the pattern 
and then adding 6mm pearls down the center.
I like this version alot.


A beautiful embellished peyote bracelet beaded by a gal from Twin Falls.
You can learn basic peyote from one of our Beaded Bead classes.

This bracelet much prettier in person. 
Beaded by Yvona from Nicole's "Ice Ruffle" pattern. 
 We have convinced Yvona to teach this -
 hopefully, sometime this summer.

This is another version of Sandy Taylor's Tila / Tile Herringbone class
 taught using an original pattern from Marcia Balonis. 
The Tiles (aka CzechMates) have been replaced with
Czech glass pearls and seed beads

We teach a number of Beaded Bead classes at Bead Street.
Masoumeh created these bracelets using beads she made in class.


 For more information and other photos, see the link at the top of this blog for a class schedule.  You can also click here for a link to Kassie's site beadingbutterfly.com.  Or here for Adele Kimpell, http://www.beadreamers.net/  and here for Marcia Balonis, http://www.baublesbybalonis.net/ .  We are currently scheduling classes for June and July.   If you would like more info or to request a class, just send us an email.

Tuesday, May 1, 2012

Freeform Peyote

We managed to squeeze in another Freeform Peyote class with Nancy.  Because this is a two-part class with 'homework' in between - we need to try and schedule this when students don't have gardens, vacations and  other life issues to deal with.  No, we are not so obsessed with beads that they are the ultimate priority in our lives.  My friend Barb, from Portland, did travel to Boise to get in on a class with Nancy.  Okay, so maybe some of us are obsessed.  Here are photos of the first class and hopefully the gals will bring in their finished projects so all of us can see them.


Elaine is making a necklace in some of my favorite colors.


Barb made great progress. 
She did send me a photo of her finished bracelet from her phone to my phone. 
When I figure out how to get the photo to my computer, I'll pass it along,


They look pretty serious don't they? 

This is Linda's 'beading palette'. 
Freeform is a little easier when you have a good selection to choose from.


This is a great example of using 'bridges.'

Saturday, April 7, 2012

Freeform Peyote Tutorial

It's inventory and tax time so have not had time to post much lately - and now we are into April already.  How did that happen?  Thought I would concentrate on just finishing one project before starting something new - a brand new concept for me.

This is more of a "how to get started with freeform" instead of a real tutorial.  You can find many on the Internet but this is how I started.   I am not a freeform beader.   So for me, starting with a little structure and control worked a lot better.

Here is the beginning of my freeform bracelet.   Notice I used mostly 11's and 15's with some 8's and very few 6's.  I kept the first strand free of any larger beads and just did segments of each color.  I forgot to 'blend' - so I have a few areas that are blocky.  Hopefully I can take care of those when I am ready to embellish.


Here is the second phase.  I have added 'bridges' because I want this piece to be looser and notice I am now blending colors from one to another.  These 'bridges' are  just little half inch to one inch segments of peyote stitched beads coming out from one area and connected somewhere else.  If they seem too skinny - just add another row of peyote stitch to that segment only.


Third step was to add picots and ruffles - just here and there - to create a lacier look. 
For those of you who took our 'Ruffle' class - this should be easy for you -
 just ruffle along a few segments, here and there.


Here is the finished piece.  At least I think it is finished. 
Bead instructors will tell you the piece will speak to you and tell you when its 'done'. 
 So far the only 'speaking'  I hear is  "pick me, pick me, buy me". 
So, I'm going to let this sit for awhile, start another piece and see. 


If you know peyote stitch - give this project a try. 
You do not have to make your item this large. 
Try a thinner band for a simple bracelet. 
 If you want to make it larger without continuing with freeform
- add a couple of larger focal beads, or a vintage button, or a colorful cabochon.
 Any questions - email or come into the store - we'd be glad to help.  Enjoy!


If you would like more info, Bead Street carries some great beginner, intermediate and  advanced books on the subject.  And. we also have a great beginner class as well. 
 Let us know if you are interested - we'll get one scheduled.

Friday, December 2, 2011

Freeform Peyote - Day 2

This is Day 2 of the Freeform Peyote workshop taught by Nancy Sathre-Vogel.  Below photos of some of the student's work.   Again, still works in progress.  In the second day, they learned how to embellish their pieces.  I look forward to seeing more of the finished projects,  Please bring them in to show me!

This is Joy's - she added some of her favorite lampwork beads


Deb almost has her necklace finished

I bet you can quess that this one was done by Janet
All beautiful, beautiful work - I really look forward to seeing all of the finished projects.  This was a fabulous workshop and hopefully we can do another 2 part session in January or February.  Everyone raved about what a great teacher Nancy was, how patient and informative, and we loved seeing her wonderful beaded necklaces.  See some of her work on her blog at www.designsbynancy.blogspot.com

Freeform Peyote Class - 1st Day

We had a 2 day workshop on freeform peyote taught by Nancy Sathre-Vogel.  Nancy had great suggestions, fabulous samples and innovative tips.  The students were panicky about the entire process, mostly because they could do whatever they wanted to do.  Nancy gave suggestions and ideas and the students kept asking "but what size beads do I use, what colors do I use, where do I put them."  Nancy  kept saying "you get to decide".  And of course, the students kept asking, "but what size.....what colors......where......"


These are all 'works in progress' - they learned how to create the base in the first class.  They then had 'homework' and will have to finish the base
before the next class.